Sunday, January 24, 2010

Daylighting from East and West Facing Windows

Windows on the east and west side of a building are very similar.  They have the same problems and qualities, but they are exactly reversed in time of day.  I think it makes sense to talk about both in the same post.
 Image taken from TraderZed's Flickr photostream under CC license

Unlike north and south window, which have roughly the same properties all day long, the light coming from east and west windows changes drastically throughout the day.  As a result, the solutions to the problems of eastern and western light can change as well.  When trying to decide what to do with a window on an eastern or western wall, it is necessary to ask yourself: how do I use this room?  When do I use it?  What experience do I want here during the day?

There may be some rooms in your house that you only use at certain times of day, or only on weekends.  Most of us are only in the bedroom in the morning and evening, when eastern and western light are most disparate.  The office, on the other hand, is typically only used during the day, when light from these windows is bright but a little more diffuse (except in the late afternoon, when western light can be very intense and warm).

pink jewel cloudsImage via Wikipedia
In the early morning, an eastern window will bring in bright, orange to yellow direct light.  While this light will be high contrast, this could be a good thing.  As I mentioned in the south window post, high contrast can make your eyes tired, but first thing in the morning as you sit and drink your coffee, contemplating the
previous night's dreams (what does it mean that in my dream the suburban street I grew up on looked like the lower east side of NYC?)  15 minutes of high contrast light can be energizing.  If your bedroom has an eastern window, ask yourself: do you like being woken by the rising sun, or do you prefer to black out your room and hit the snooze button a few times?

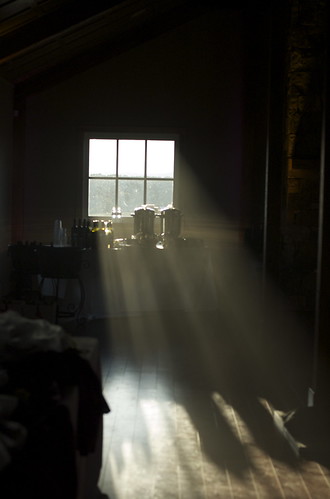
A western window gets that direct orange light in the evening, and here again you have to think about how and when you use the room.  At sunset, the average building is as warm as it is going to get, having absorbed sunlight all day long, so that direct western sun can be awfully hot.  If you live in the far north in the winter, this may be as pleasant as sitting by the fireplace, and the view of the sky may be spectacular at sunset.  In the New Mexico desert, in the middle of August, you probably just want that light to go away and bug somebody else, view or not.

Eastern and Western windows are extremely versatile, and versatile solutions work best.  Light blue curtains would cool off and mellow the sun rise and sunset light, while red, orange or yellow curtains would enhance the fireplace effect.  Blinds are also ideal for these windows, allowing for complete control of the light.  Highly reflective or metallic horizontal blinds allow you to bounce the light up to the ceiling or down to the floor, if you prefer.   These windows are more complex, but with complexity comes increased opportunity to shape your experience.
Enhanced by Zemanta

Wednesday, January 20, 2010

Northern Windows, Daylighting and Views

Widows on the north side of a building are ideal for views, because everything you are looking at from these windows is facing the sun, and presenting its best lit side to you.  For the same reason, a northern window is getting tons of reflected light from the sky and the landscape (or the fence/wall/other building placed just a few feet away) and no direct sunlight at all.  So in every way, it is just the opposite of the southern window.

Of course, this means that the problems are just the opposite too.  Instead of too much light, you might have the issue of not enough.  A good architect/designer/builder will ideally plan for larger northern windows, to take better advantage of the view and the daylight, but for all of the reasons listed previously (and more, suppose the lot to the north is an apartment building, then you have privacy issues and no view) sometimes this ideal plan goes awry.

As an example, the building that I live in now was clearly planned with absolutely no thought given to the cardinal directions.  I know this, because the same basic building footprint is repeated about 7 times in the complex, and the orientation is different each time.  So here is my "lovely" northern view:


10 feet of concrete, 10 feet of mulch, a mossy fence and an ugly building.  No sky, no landscape.  But even this one small door window provides ample light for our kitchen.  This is a cabinet door opposite the window, and look how clear the shadow is:


Because the light is diffuse, if my hand moves away just a little the shadow disappears.  With bright, glossy white cabinets opposite the north window, I never turn the kitchen lights on during the day.  Which brings us to the point of this post: maximizing that light.

In terms of daylighting, the worst thing you can do with a northern window is put a lot of large furniture or appliances right next to it.  This reduces the angle of light coming in through the window, and therefore the amount of light.  If you must put something right by the window, it helps if it is a bright color.  The idea is to allow an uninterrupted path for the light to come in through the window at any angle and make it to the far wall, the ceiling, or the two perpendicular  walls.

From there, some of the same tricks in the southern window post apply.  Namely, mirrors and bright colors. A large mirror opposite a north facing window bounces light back into the room, but also it has the added benefit of making the view accessible from almost anywhere.  If you are seated with your back to the window, you can still see the view in the mirror.  Mirrors also make the room appear larger, both through the psychological trick of the appearance of more space and because as light fills the room is seems to expand.  When the ceiling and corners of a room are dark, it seems to close in on you.

I recommend against curtains or blinds on a north window unless they are necessary for privacy.  Putting anything between the window and the room reduces daylighting and obscures the view.  Of course, if your bedroom or bathroom is on the north, you may want to fully obscure the view in, but otherwise I say embrace the outside world and leave the view open.

In terms of colors, I would recommend that walls be bright.  Blue and yellow have the highest reflective index but any color that is pale (i.e. closer to white) will do well.  You can also use high gloss or semi gloss paints in a room that has only northern light, because there is little risk of glare when the light is so diffuse.  Ceilings should also be very bright.  If you are a renter and you think you have white walls, you may want to take a closer look: building owners love off white colors like Swiss Coffee because they appear white at a glance and don't get dirty as easily, but they are actually tan.  This could be reducing the amount of bounced light in your rooms by a great deal, and going for a more true white can significantly improve lighting conditions.

Last note on color: if you want to have a darker accent color on one wall, make it the wall with the window.  The window is already providing all the light you need in that direction, so the bounce from that wall is redundant.

When planning a building or home, it is ideal to put the most public spaces and the spaces that you want to have the best views on the north.  If you are renting or buying an existing building, however, the designer may not have considered this, or decided something else was more important, in which case a private room might end up on the north.  In this case there is not much that you can do to get the privacy you need without blocking at least some of that light.  Possibly the best option is an adhesive film that scatters the light a little but lets most of it pass through, like the one in the add there, or at this site.  A completely frosted glass or film, however, would reflect almost half of the light back out the window.  This option is not very cheap, and the film can be difficult to cut and apply just right, but with a little patience and care it can solve all your privacy concerns without much light lost.

Also, because the film can be difficult to cut just right, consider leaving a one inch gap around the edges.  This will not be enough width to see anything through the window, and it can make uneven edges much cleaner looking.

 So aside from the privacy concern, the advice is pretty simple: just get out of the way and let the light do the work for you!  Avoid obscuring or absorbing that light before it has bounced around a little, and you should have a beautifully lit room from dawn until dusk.

Tuesday, January 19, 2010

Free Sushi! (well, practically free anyway) Spicy Tuna Roll Recipe

Sunday night, Courtney had a sudden urge for sushi.  We did not, however, feel like going out, nor do we know which sushi places are good in town.  We decided to see if we could scrounge together a few sushi like items from the stuff we had in our kitchen already.

We already had nori from a previous sushi night, we always have rice and veggies on hand, the one thing that we did not have just lying around the kitchen?  Sashimi grade raw fish.  So, although every recipe you find online will tell you not to do this, we decided to be adventurous and make spicy tuna rolls from canned tuna.  The results were astoundingly good.  One can of tuna produced about 6 rolls, each roll was about 8 pieces, so we had dinner for two, for two night, from only a dollars worth of canned tuna!  Eat that, it's delicious.  All of the other ingredients (rice, nori, vinegar, etc.) were purchased in bulk, and the small portion we used was almost negligible in terms of cost.  Hence, free seeming sushi!


Our idea of a last minute meal.  Aren't you jealous?

Courtney did most of the rolling (I had always done it before, and she wanted to learn) and I made the spicy tuna filling.  So here is my spicy tuna roll recipe.

Ingredients:

1 can tuna (and because this is a green blog, take a look at this before your next tuna purchase)
6 sheets nori, dried seaweed for rolling
2 cups white rice (sushi rice for best results)
Sriracha (or other hot sauce)
1/3 to 1/2 cup Mayonnaise
1 avocado, cut into thin strips
~1/4 carrot, cut into thin strips
1 small cucumber, cut into thin strips
Rice vinegar [several uses, just make sure you have plenty]
1/4 cup (or to taste) sugar
Soy Sauce
Wasabi (powdered is fine)

Tools:
large, flat plate or bowl for rice
bamboo sushi rolling mat (find at Asian markets)

First, cook the rice.  For sushi, use twice as much water as dry rice, so 4 cups water to 2 cups rice.  While the rice is cooking, make the spicy tuna.  Drain liquid from can and mix tuna in a bowl with mayonnaise and sriracha (for extra spice, add a little cayenne pepper, chili oil, and/or chili powder).  When the rice is done, stir and dump it out on the plate.  Sprinkle with rice vinegar (3 or 4 tsp) and the sugar.  Mix thoroughly.  Allow the rice to cool to room temperature before making rolls.

While rice cools, get all of the other ingredients ready at your rolling station, have the mat laid out on a large cutting board with the first nori sheet, and keep a small bowl of rice vinegar next to the rice.  If the rice is still not cool enough, have a glass of sake.  When rice is cool, soak your fingers in rice vinegar (that is what the bowl is for) and pat a thin layer of rice down on the nori, covering it to the edges from left to right, but leaving a half inch to an inch of nori open at the front and back. Each time you go back for more rice, and periodically while patting it into place, dip your fingers in the rice vinegar again.  This will keep the rice from sticking to you (at least sticking too crazy much).  When you have an even layer of rice, about 1/4 inch deep (if you make it any deeper, it will not roll well, but thinner is just fine) make a little row of tuna from left to right across the middle of the roll, about a half inch thick.  Lay in one thin layer of carrots, cucumbers and avocado on either side of the tuna.

Now, roll the bottom half of the nori over the center row of ingredients, pressing down gently.  Next, bring the top half up and over the bottom, dabbing a little rice vinegar on the overlapping edge of nori to help seal it..  Now you should have an even cylinder.  Wrap the mat around the cylinder, and pressing a little more firmly, roll it as you would a rolling pin to compact the ingredients a little.  This will make it easier to cut.

Cut the roll into roughly 8 or 10 equal pieces.  Allow the end pieces to be a little bigger, or they will fall apart while cutting.  Use a very sharp knife with a serrated edge for best results.

Repeat until tuna and rice are all used up, should yield about 6 rolls.  Serve on a cutting board or platter with soy sauce and wasabi, enjoy.  Leftovers will keep well in the fridge for a day, because there is no raw fish to get funky.

Next time Courtney I think we're turning Japanese, we will attempt a gluten free tempura as well, so that we can make spider rolls!  I will post a recipe for gluten free tempura batter if it works out.

Daylighting from Southern Windows

As I stated last time, southern windows get the most light throughout the day.  Also, that light is very harsh, very direct, and very high contrast.  So even though they get the most light, that light is the hardest to use to your advantage.  Here is a picture of my living room/entry early in the morning on a sunny day, the light is coming from a south facing window:


The effect is not that harsh in person, our eyes compensate better than the digital camera in my phone, but that contrast is real, not enhanced in any way.  Looking at the room like this will make your eyes tired from compensating for light and darkness, and this can make you feel tired and stressed after a few hours.

So what can we do?  Well let me show another picture, the same view taken the same time of day, but the sun has been obscured by some heavy clouds:

 
Much better, no?  The ceiling is still cave like, but the contrast on most stuff is very manageable.  This is because the cloud scatters the light, making it more diffuse.  It is the contrast that makes southern light so unpleasant.  To remove that harsh direct light and shadow, architects and engineers design elaborate shading devices (Courtney just finished designing one for a school project, actually) that only let in indirect light.  Adding something like that to an already finished building, however, is often impractical.  Furthermore, if you  are a tenant in an apartment or worker in an office, that kind of decision is probably not up to you.

So here is something that you can do: hanging light, gauzy white curtains in front of a southern window will scatter the light in all directions, creating a very even, very pleasant light all over the room (if the curtains are too lacy, i.e. with a bunch of small holes, this will not work as well).  To illustrate, here is the same view again, same time of day, not a cloud between the sun and my window, but with an ordinary white bed sheet tacked up in front of the window:


(I think that is Cleo's ear right there ^ )
Even the ceiling is pretty well lit here.  True, there is still a fair amount of glare by the window itself, but everything else in the room is beautifully even.  This is ideal lighting for most tasks.

The white curtain is a very low tech, very cheap fix for a south facing window.  Closed, it provides privacy and diffuse light.  On a heavily overcast or rainy day you may want to open it, as the curtain does reduce the total amount of light getting in (some is reflected back out the window again).

There are other, more permanent solutions as well (like using frosted glass) but they are mostly more expensive, and as above, not up to an individual tenant or worker.  Also, frosted glass makes a view from the window impossible, while curtains can be drawn back.  But here is one more thing that you can do to maximize daylight in a room with a south facing window:

 
Hang a mirror on the wall opposite the window.  Courtney and I have used a pattern of mirror tiles, but one large mirror would be even more affective.  This reflects the light that makes it to the far wall back into the room, lighting the other side of objects.  To illustrate, here is an image of a piece of paper held just about a foot away from the mirror:

The top half is catching reflected light from the mirror.  The further from the mirror you are, the lest distinct that line would be, and about three feet away it would be almost indistinguishable.

Using these two techniques in conjunction, the curtain and the mirror, you can get enough light to fill a room evenly and beautifully.  Once the contrast is dealt with, the fact that a southern window gets so much light becomes useful: even a very small window will provide enough light to fill the room most days.

Sunday, January 17, 2010

Here Comes the Sun: An overview of daylighting

Even in pretty poor weather, and at higher latitudes, the sun usually provides enough light for several hours of the day to perform most tasks easily.  Unfortunately, most of us live and work in buildings which were designed during a period when energy was cheap and global warming was something that only a few crazy engineers with beards understood.  Consequentially, many architects and building designers used windows to frame views, and not to let in adequate light.  Builders sometimes take the same plan and build it over and over again on different lots (why waste time and money on a new design when the last one passed inspection?), which may mean changing the orientation in relation to the cardinal directions.  The builder may not consider the impact that this would have on window placement.

The first thing to understand about daylighting is that it can do more harm than good if poorly managed.  Windows placed with little thought given to the sun can lead to high contrast and harsh glare, spaces that are uncomfortable to the eye and lighting that is ill suited to most tasks. To create relatively even, soothing and useful light, there are a few basic concepts that you should grasp: direction of light, changes throughout the day and seasons, color temperature, contrast and diffusion.

Diffusion is the relative uniformity of light in terms of directionality.  If all of the light in a space is moving in one direction there is no diffusion and the contrast is very high (imagine a room lit with only one flashlight at night).  If the light is moving in every direction evenly, then the diffusion is very high and there is no contrast (imagine a room with many lights on all over, with bright walls and many mirrors).


Very diffuse, low contrast light from many sources


High contrast, no diffusion, single light source


Color temperature refers to the exact color of a light source.  Most light sources are considered "white," but there is a clear color difference between a fluorescent bulb and an incandescent bulb, or between sunlight and the light of a campfire. In general, if the light is more yellow, red or pink, it is thought to be warm.  If the light is more blue, green, or gray, it is thought to be cool.  As an exercise, think of the difference between sunlight outside at sunset vs. fluorescent light inside.  Not to say that cool is bad and warm is good, sunlight at midday is considered "cool" because more blue light is produced than any other color (that is why the sky appears blue).  Instead think of it this way: 'warm' light is cozier and more comforting, a wood fire (campfire or fireplace) produces a very warm orange glow.  Cool light is brighter and more vibrant, more energetic and dynamic.

Next, it is important to understand the course of the sun through the sky and how that course changes from season to season and your latitude.  Everyone knows that the sun rises in the east and sets in the west, but fewer people know (though I think you all went over this in 5th grade) that the sun is slightly to the south of us in the summer, and more obviously south during the winter (opposite south of the equator).  In the summer, the sun is closer to being directly overhead at noon, so everything casts a very small shadow just beneath itself.  In the winter, the sun is lower, close to the horizon at noon, and so everything casts long shadows to the north.  This effect is much more pronounced the further away from the equator you are, and almost non existent on the equator.

Finally, by direction of light I mean the cardinals: north, south, east and west.  The quality of light coming from each of these directions is dramatically different, and also changes to a degree based on time of day.  The qualities of northern and southern light are also flipped north and south of the equator, this description is for the Northern Hemisphere (because I and everyone I know lives up here).

As a general rule, light from the south is very direct, very bright, creates high contrast and sharp shadows.  Windows in southern walls get the most light throughout the day (and the most heat gain as a result) but that light is also harsher than any other.  Northern light, as you might have guessed, is just the opposite.  Much less light comes through these windows, but the the light from the north is extremely diffuse, creating much less contrast and shadow.  This is because Northern light is all reflected: off the sky, the earth, the water, and anything else you can see from the window, and therefore is coming from every direction at once instead of from one specific source.  The result is soothing, even light, and northern windows generally provide the best views.

Eastern and western light are most affected by time of day.  Because the sun rises in the east and sets in the west, an eastern window will be like a southern window (direct harsh light) in the morning and a northern window (less light, more diffuse, great views) in the afternoon.  A western window, obviously, just the opposite: diffuse light in the morning, harsh and direct in the afternoon.  One more important thing about east and west windows, however, is that the color temperature changes drastically at dawn and dusk.

"Well that is all fascinating Gabe, but how does it help me?"  Excellent question.  Now that we have a general understanding of daylighting it is easier to discuss solutions to real world problems, starting, for Kim, with southern windows.

Thursday, January 14, 2010

No Rainbows Without Rain

Yesterday I saw the most perfect rainbow I have ever seen in my life.  It was a full 180 degrees, clearly visible, from horizon to horizon.  I was driving at the time, and so unable to take a picture, and by the time I could stop the angle or the light was wrong, and only a fraction of it was still in view.  I do miss the weather being mostly comfortable every day in SoCal, but there is a real beauty to the passing of the seasons and the unique sky and landscapes created by harsher weather.  I think you can especially appreciate this if you are into winter sports (Courtney and I love skiing).

Back to the rainbow, I think I know more than the average bear about light and optics (though I have met more than a few people who make my knowledge appear paltry) and yet I found myself puzzling yesterday, as I drove, about the fact that a rainbow always seems to describe a portion of a perfect circle.  After a little internet research today (so if this is incorrect, don't blame me, blame my generations over reliance on the internet as a source of valid information) I found the reason why.  Small raindrops are as close as possible to being perfectly spherical.  Some of the sun's light will bounce off of these raindrops, and it will always bounce at almost exactly 42 degrees.  Why almost and not exactly, you ask?  Well that is precisely what creates the rainbow.  The angle varies slightly based on the frequency of the light, which as you may know determines the color of the light.  So red light, having a very low frequency, is on one end of the spectrum, and violet light, being very high is on the other.  Essentially, a rainbow is the result of millions of individual raindrops acting as tiny prisms, where you can only see the reflected light of drops that are approximately 42 degrees off of a line between your head and your heads shadow, forming a perfect circle cut off only by the horizon.  Consequentially, that means that the rainbow appears, to every single individual observing it, to be perfectly centered on them!

If you were looking out on a rainstorm from the top of a very tall building or tower, near dusk, the rainbow could appear as a mostly complete circle broken only by the shadow of the building.  Pilots flying have reported on numerous occasions seeing a complete circle of rainbow when conditions are right.

Thinking about light is part of my job as a sustainability consultant that has always brought me great joy.  Optics are fascinating to me for many reasons, and natural daylighting is a very important part of sustainability.  Just a quick tidbit, did you know that the sun produces energy at all frequencies, but the vast, vast majority of that energy is produced in the spectrum of visible light?  Energy above this spectrum (UV) is almost all damaging to tissue.  This blew my mind the first time I heard about it.  It is one of those facts that seems just too perfect, as if the universe was made for us.  Of course, the truth is that we evolved into our current condition to fit our environment; we were made for the universe.

With all this knocking around in my head, I have decided to post some basic tips about maximizing daylight in your home or office, working with the conditions you have.  Not tonight however, I have done enough blogging for today.  Until next time, good night, and I hope that you get a chance to wonder at the light a little tomorrow.

Monday, January 11, 2010

Floors you could eat off

The addition of the lovely little miss Cleopatra (our puppy) to our household has, in short, made a bit of a mess. For those few of you out in the internet who have not heard, dogs are dirty. You might even say filthy. At the Dog Park yesterday I watched with resignation as Cleo chased and fled through, rolled and wrestled in, and even ate (I know, gross) the mud. Luckily she loves jumping in the little stream near the parking lot after a good wrestling match, which makes it a little easier to towel off some of that caked on dirt, but the upholstery in my car is still basically ruined.

Cleo uses our tiny patch of back yard as a bathroom, and half the time when she returns she trails muddy paw prints through our kitchen (I like to think there is nothing in those paw prints but mud, please don't enlighten me if I am wrong). The result of all this is that keeping our floors clean has become a daily struggle. To make matters worse, most commercial cleaning products have either bleach or ammonia in them, or some other substance that is toxic to our pets. So Cleo makes the floors dirtier and makes it harder to clean them.

As a solution, I have started sprinkling baking soda on the floors before sweeping. The results are amazing. I got the idea when I remembered working in the scene shop at UCLA. When they swept the shop, they first sprinkled this stuff that looked like red dirt (I never found out what it actually was) which stuck to the dirt and sawdust and clumped up into easily sweepable clumps. I thought "well I don't have red dirt, but I have baking soda." After this technique, the floors are sparkling, as if I had just mopped with bleach.

The soda turns grey as it adheres to the dust, and I think it helps hold it down too, instead of flying up in the air and causing me to have an allergic fit. I sprinkle it in the corners and along the walls and sweep it towards the center of the room, and this also allows me to see quite clearly where I have swept and where I need to do more. Finally, and most awesomely, the baking soda disinfects as you sweep, and it is totally harmless to the pets. This is important, because as the title of this post suggests, Cleo eats off of the floor all the time.

Keeping our home healthy is part of going green, and since we purchase the baking soda in gigantic bulk bags and it replaces several individual bottles of specialty cleaner, it is reducing waste and consumption.

Just wanted to share that little tid bit with everyone, because it makes me happy every time I clean the kitchen now.

Sunday, January 10, 2010

Canning for the cold months

Kim, my friend from UCLA, posted on her blog about making persimmon jam. As improbable as this may be, I don't think I have ever, in my life, tasted a persimmon. Still, the recipe sounded delicious, mostly because all jam sounds delicious to me. Especially during these cold months (although, as I have discovered, Eugene isn't all that cold in the winter, it isn't even below freezing! I thought I was in for some winter) the thought of homemade canned goods warms my heart.

I have made several forays into the canning world, including making raspberry chipotle jam as a wedding favor back in 2008, and since we weren't totally sure of the guest count until the last minute that meant making about 170 tiny jars of jam. It was a crazy amount of work, but the result was (in my humble opinion) delicious. So tonight I have been thinking about jam and canning, where it came from and why it is so good.

Canning, like most methods of preserving, comes from the problem of keeping food before refrigeration was widely available. It was also a very important method of having enough to eat during the winter before we could have fresh fruits and vegetable shipped in from the opposite hemisphere. Basically, it uses heat to sterilize and a combination of acid and sugar to stabilize fruit (including tomatoes). After cooking the fruit and getting it into the jars (which makes a gigantic mess unless you have a jar funnel) the closed jars are submerged in boiling water, which increases the pressure and forces most of the air out. This leaves a little vacuum which seals the lid to the jar and insures nothing will get in or out for a long time.

Done properly, canned jam or tomato sauce will keep for a year, after which the risk of botulism begins to increase. Don't be too scared, botulism is extremely rare if you follow the rules for home canning. But be scared enough to follow those rules, and don't try to keep stuff for more than a year, botulism can kill you if not treated immediately. Check out this section of about.com for a great overview of those rules.

At this point, you should be wondering "what is this post doing on a 'green' blog? (or 'why would I risk botulism for this?)" Well, the answer is long, but bare with me, I think it is also interesting.

We all know that buying local is good for many reasons: it supports the economy and community that you live in, it reduces embodied energy from transportation, and it allows for a personal connection with your vendors (trust and accountability). But if you are really committed to buying local, and you live very far north or south of the equator, then that means no fresh fruit or vegetables for several months out of the year! Canning and other methods of preserving are your only way of getting around this problem. Much like our recent ancestors, but for very different reasons, it is an excellent idea for us to can the excesses of summer for the dearth of winter.

If you read my last blog post about efficient cooking (almost a month ago I know, sorry about that) you might be saying 'wait a minute, wouldn't canning in the summer be generating a lot of waste heat and burning a lot of energy?' Well yes, it would. And quite frankly, it puts me in an awkward position, you bringing that up. Nevertheless, when you compare the amount of energy required to properly can food compared to the energy that is used on a regular basis to ship food from the Cono Sur to America, and when you throw in the added benefits of supporting local economies, it is clear that canning produce from the local Farmers Market beats out mid winter berries and asparagus in the carbon footprint arena. Also, when you buy fruit in its prime season locally, it tends to be really cheap, because the local market is glutted with it just then. For the same reason, the fruits and veggies in the market that are on sale are usually the ones in season locally.

So in short: canning is great economically, ecologically, tastelogically (yes, I know that is not a word), and perhaps most importantly, it is one of those things that just makes us happy. After Courtney's and my wedding, due to the fact that a distant relative was also getting married at the same time (which meant much of my extended family had the dilemma of choosing which wedding they could attend) there were many, many left over jars of raspberry chipotle jam. We used it on toast and tortillas, in sauces, as salsa, with chicken, with fish, any way we could think of. We never once got tired of it. Home made jam, and canned food in general, is a labor of love, and as such it usually pleases the palate and warms the soul, and the green aspect may as well be an after thought.